Adding context nodes
To add a context node, either hit the 'n' keyboard shortcut, or click on 'add >> context node', (here the double arrows ">>" mean "followed by").
This will bring up a form popup (a.k.a. 'edit box') that allows you to type the phrase or descriptive words for your new node. When you click 'OK' you will see the new context node that now shows up as a child inside the current scope of the main page.
The 'save' menuitem also has an asterisk next to it, indicating that changes to the vault have been made. To make your changes permanent, click 'save'.
If you would like to insert the new context node in a particular location, then you will select an existing c-node (by clicking or using the 'ARROW' keys). Once you have done this, any added context node will be place just before the selected node. The default placement, otherwise, will be at the very last c-node position.
Adding a url resource item
To add a url resource, hit the 'u' keyboard shortcut or click on the 'add >> url' menuitem.
This will bring up a URL edit box that has two fields to fill in: 'title' and web 'address'. Fill those in and click 'OK' or 'CANCEL'. This adds the new URL resources to the list of resources in the current scope of the main page. Save your work to make this permanent in the vault. URL resources will have a blue globe icon [![]() ] next to them.
] next to them.
You have the option to open a browser tab immediately by pressing and holding the 'ALT' key while you add the URL. When you 'ALT+u' a browser tab opens automatically to the default URL (currently 'www.google.com'), and then you can navigate to the URL that you need. The convenient thing is that when you go back to your UD app tab in the browser, the URL is updated automatically, and then you can save the new URL resource that has been auto-updated with the URL that you landed on during your browser navigation.
Each URL resources has a push-pin to control whether your navigation inside a tab will auto-update the address and title. Auto-update happens when you return to the UD App tab. The 'pinned' URL has a stuck push pin icon like this:

For resources that you do want to have updated, you will need to set it to the 'unstuck' state, which will look like this:

One thing to be aware of is that any newly created URL that was launched using 'ALT+u' will have an unstuck setting that gets automactically stuck when you save the vault. From this point on, the push-pin control is entirely in your hands.
Adding a text resource
To add a text resource, hit the 't' keyboard shortcut or click on 'add' >> 'text doc'.
This will bring up a text info popup that looks like this:
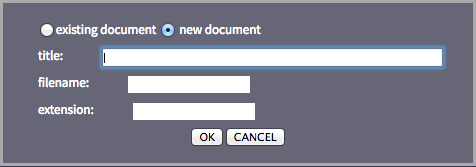
By default the 'new document' radio button is selected, allowing you to enter the 'title', 'filename' and file extension 'ext'. Notice that there is no place to enter a file system path. This is because you are creating a native document and it is going to live in the UD app install directory under a vault-specific subdirectory. Click 'OK' and you will see the new document added to your resources in the current scope of the main page. Text documents have a page icon [![]() ] next to them.
] next to them.
Click on the 'existing document' radio button to point to a document that exists somewhere on the file system. In this case you will need to provide a full path (a.k.a. path + filename + extension) to the location of that document and a title for display inside UD app.
You once again have the option to launch the text file immediately by presing and holding the 'ALT' key when creating the text resource. Note that this will create a new file instantaneously on your hard drive, and it is placed in a 'res' directory, basically so you don't have to worry about such details when you are wanting to just move quickly with immediate tasks at hand. When you do 'ALT + t', this launchs a text file in one of the basic text editors, either TextEdit if you're on the Mac platform, or Notepad.exe if you're on a Windows machine.
Adding files
Yes, a text document is pretty much just a file that contains text, but the UD app adds special convenience for text documents. The same conveniences are not provided with other files. We can open files, but not close them (at this point) from inside the UD app. We cannot create new vesions of these files, and they are never native to the application. For this reason we visually differenciate text file resources and resources that are not text files. Generic files will have the 'box' icon [![]() ] next to them, at least for the time being.
] next to them, at least for the time being.
To add a file resource, hit the 'f' keyboard shortcut or click on 'add' >> 'file'. This will bring up a file edit popup and allow you to specify a 'path' and 'filename'. Be sure to include the file extension along with the filename, and do not include the filename or extension with the path. Click 'OK' to add the new file resource to the current scope. Click save to make that resource a permanent part of the vault.
Editing vault items Removing vault items
In order to edit a resource, you first must select it by clicking on it or by using the 'ARROW' keys. After selecting the resource, click on 'edit' and make whatever changes you need. You will be able to 'OK' and save those changes in the usual manner.
To remove a context node or a resource item from the vault, select it and click on 'remove' in the main menu. To make that change permanent in the vault you click 'save' or hit the 's' shortcut key.
To remove an entire branch, or in other words, remove a context node and all of its descendant items, select the context node, and click 'remove'. To make that change permanent in the vault you click 'save' and confirm that you want to delete a node with child items.
To remove only an intervening node, the top of a branch, but not it's decendant nodes or items, hold down the 'ALT' key when you click on 'remove'. This action will delete the selected node and also move any children it might have had to the same level and position it occupied before being deleted. So, basically, with the 'ALT+remove' action, the grandparent node that loses it's child, will adopt the grandchildren as immediate children. That will also include adopting any resources that belonged to the deleted context node.
Our company was founded in July 2017 by Bradley Pliam.
The headquarters is currently in Austin, Texas.
Ideas that have been in gestation since the early 2000s have now finally been given 'wings'.
The mission of the company is to deliver happiness in the form of value and great user experience via high quality software, being honest about what is being delivered, and up-front about any current limitations. The world of software has some great things, along with some insidiously bad aspects. We intend to be a positive influence.
Meet our current staff...